It seems we had a slight technical glitch earlier this month, which prevented all the photo- challenge entries from posting properly on our website. But I checked today, and lots are posted now under this month’s theme, “Hospitality and Welcome.” (My apologies if you panicked when I mentioned last week that few images had been entered. All the submitted photos are up there now.)
I went through the photos posted so far, and I see a trend I’d like to point out. It’s a photo-taking blunder, if you will, one I call “The Snapshot Trap.” Since my job here at The Right Way to Travel is to identify the photography mistakes people typically make and teach you how to fix them, I’m going to focus, this week, on easy ways to improve your snapshots.
FIRST, A DISCLAIMER
A lot of our readers are novice photographers, among them a large group of writers who had never picked up a camera for anything more than family or vacation snapshots before they decided to start bundling pictures with their travel articles.
If you fall into that group, and your image is among these I’m going to critique below, please take heart. We all have to start somewhere. And I’m going to offer what I hope you’ll see as constructive criticism. That is how I intend it.
That said, let’s get started…
THE UBIQUITOUS SNAPSHOT
When I say “snapshot,” what I really mean is: a picture without a purpose.
Take this picture, for example …

Several elements compete for the viewer’s attention in this photograph.
Photo Composition Tip: Paths and Leading Lines
There are actually two paths — the rock path on the left and the fence line on the right. And both lead into and then right out of the frame.
Paths and leading lines are wonderful elements in a photo, but placement of these lines is critical.
When composing your shot, decide what the subject is. If it’s the flowers, then compose the shot for the strongest visual of the flowers. Make them stand out. Get in closer. And leave the rest of the garden for another photograph.
If it’s the path, then arrange for a clearer view of the path and use it to draw the viewer into the picture rather than out of it. (In other words: Have the path wind toward the center of the picture rather than lead toward the side.)
If you’re not sure what you want to photograph, then stop for a second and think about it. Look at all the elements and concentrate on them — one at a time. Start with the stone path on the left. Walk two steps to the left and take a picture of the stones leading into the photograph. Take some verticals, take some horizontals, stand on a bench, get down on one knee. Then concentrate on the fence on the right or maybe the flowers in the foreground.
If you don’t know what your subject is, then your viewer won’t know either.
Take a look at this next shot…
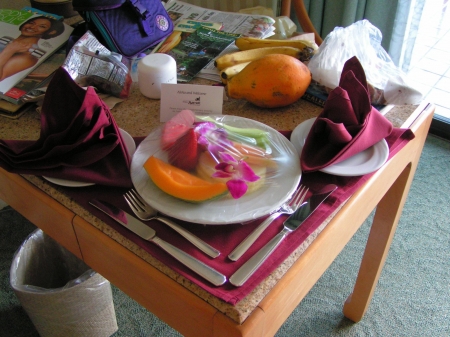
Photo Composition Tip: Clutter
We’ve talked about de-cluttering your images before.
One of the problems with clutter is that there’s just too much going on.
This shot, for example, has too many distractions in it. Now, I understand that some cameras produce blurry pictures when you’re too close. But this photographer could have improved this shot in many ways — by getting closer to the subject; clearing the table of the extras; changing angles, so as not to see the table legs, floor, etc.
If there are things in your composition you don’t want in your photo, then get rid of them (either by moving them or moving yourself). Clutter in your pictures is an image killer every time.
Photo Composition Tip: Placement and Angle
This next shot falls into the “snapshot” field for another reason — placement and angle.
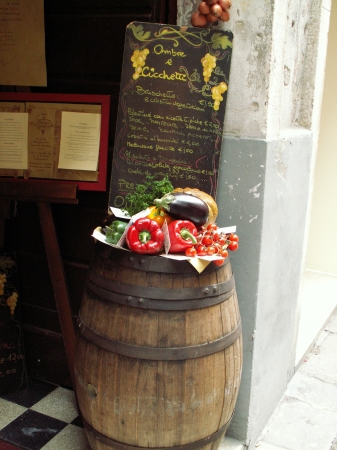
This shot does have a subject, though it may not be strong enough to claim title to “predominate point of interest.” But what bothers me here is the angle.
The dark, shaded area on the left as you enter the restaurant competes with the light, bright wall of the street on the right.
They merge right behind the barrel and sign, which gives a sense of division, dividing this image almost in half visually.
You might solve this problem by taking a few steps to the right and photographing more toward the door of the restaurant, though you might have to lose the sign that way. Another alternative would be to just get in a bit closer and angle in slightly, cropping out the bright area to the right and lining the barrel up more to the right-third line.
Maybe something more like this:
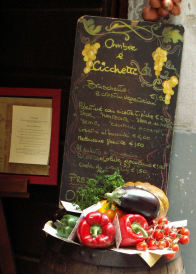
My point is: The difference between a snapshot and a good photograph is just a little bit of thought.
I encourage you to always look though the frame of your shot and re-arrange if you need to.
Move around and re-angle yourself. Look at what the light is doing, watch for dark areas and light areas and make sure they are where you want them to be, placed for greatest impact.
Watch for clutter, make sure everything in your shot is there for a reason and makes sense — generally, the less there is, the better. Decide what your subject is and shoot for it, creating a dominate point of interest.
ENTER TO WIN!
Remember this month’s challenge ends a little early. The entry deadline is this Monday, April 23. So give it a go and let’s see what you’ve got. The theme is “Hospitality and Welcome” — log on to our website at: http://www.thephotographerslife.com and register to win.
If you’re a first-time user, you’ll need to register first on the “register” link on the right side bar. Once you have a username and password, click “Enter to Win” to upload your photo. Only one photo per applicant will be considered.
[Editor’s Note: Learn more about how you can turn your pictures into cash in our free online newsletter The Right Way to Travel. Sign up here today and we’ll send you a new report, Selling Photos for Cash: A Quick-Start Guide, completely FREE.]
Travel Photography Resources
5 Dos and 2 Don’ts for Travel Photography
Take Great Photos And Get Paid More For Your Travel Articles
Turning a Photography Hobby into a Monthly Income
The Pros Of Selling Your Images As Stock Photography
16 Mobile Photography Tips And Tricks Every Photographer Should Know
Camera Buying Guide: How to Buy the Right Camera
Travel Writing Resources
How To Become A Travel Writer – The Easy Way
Easy Steps To Landing Your First Byline As A Travel Writer
Marketing For Travel Writers: 5 Ways To Get Started
22 Travel Story Ideas To Get You Published
