A few years ago I went on a photo trip to the Grand Canyon, with stops along the way at Petrified Forest National Park and the City of Sedona, both in Arizona. Because most of my trips, including this one, are self-produced (I pay my own way), I include as many subjects as I can in my schedule. This translates into long days, but most of the time the effort pays off. The first stop of the trip was at Petrified Forest, which due to its remote location in Northeast Arizona is not as much visited as other national parks. The park’s main attractions are its petrified wood and colorful badlands. I had previously visited and photographed the area with the highest concentration of petrified wood, and this time I wanted to visit the badlands in an area called the Painted Desert. The Painted Desert is also known for its numerous petroglyphs, which are basically ancient figures carved on rock. I have a personal interest in photographing petroglyphs and other rock art, and in addition one of my clients is the Western National Parks Association, which among other things publishes books for a number of national parks in the West. Because the park’s visiting hours were not convenient to photographing during the Golden Hour (first and last light), I decided to hike into the Painted Desert and camp overnight. Camping in the desert requires careful planning because there you have to carry everything, including water, and there is very little natural cover in the way of trees or rock ledges. To complicate matters the Painted Desert is a large area without marked trails, and when I asked the ranger where I could go to photograph petroglyphs, he simply waved towards the (more or less) north. I decided to hike into the Painted Desert about two miles before setting up camp and scouting the area. While scouting in late afternoon I photographed some interesting rock formations as well as colorful badlands, and I found a very nice slab of sandstone with a wide variety of petroglyphs. Unfortunately the slab was already in the shade when I found it, but I calculated that it would be nicely lit first thing in the morning. I made a mental note of its location and decided to return the next day (that’s why you scout). The next morning I got up before dawn and hiked over to the slab with petroglyphs. The morning was cloudless so I knew the first rays of the sun would illuminate the rock. When the sun lit up the petroglyphs I took a variety of pictures, making sure some were vertical, others horizontals, others had more sky, others less, etc. I follow this pattern with almost every subject to make sure I give potential editors and designers many choices for their layouts. 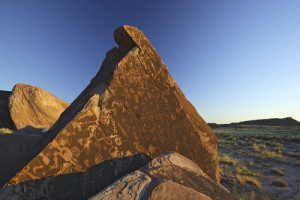 As I typically do, when I returned from the trip I sent out a few emails to clients who might be interested in my latest images of the subjects I photographed. Included in my mailing was the Western National Parks Association. A few months later the WNPA invited me to submit petroglyph images for an upcoming book they were working on called “Petroglyphs of the Southwest.” I sent them a selection of my best petroglyph pictures, including some of the slab. About a year later I was informed they had selected an image of the slab for the cover of the book (plus a handful of others for interior use), and a few months after that the book was published! I believe my shot was selected because it is very simple (red sandstone against a cloudless blue sky); the slab itself is graphic, pointing towards the sky; the shot was unique (I have never seen pictures of this particular rock elsewhere); and there is empty space (the sky)for the title of the book. Although there are no guarantees that you will make money from your photos of your trip, your chances will increase substantially if you…
- Have a plan for what subjects you want to photograph,
- Take a variety of images of the same subject,
- Identify publications that would be interested in those kinds of shots, and
- Market your images to those publications.
Now go out and shoot something! [Editor’s Note: Learn more about how you can turn your pictures into cash in our free online newsletter The Right Way to Travel. Sign up here today and we’ll send you a new report, Selling Photos for Cash: A Quick-Start Guide, completely FREE.]
Travel Photography Resources
5 Dos and 2 Don’ts for Travel Photography
Take Great Photos And Get Paid More For Your Travel Articles
Turning a Photography Hobby into a Monthly Income
The Pros Of Selling Your Images As Stock Photography
16 Mobile Photography Tips And Tricks Every Photographer Should Know
