For today’s practical photo composition tip of the week, I’d like to offer you some advice you can use no matter what kind of picture you’re taking – from family photos at a birthday party… to cityscapes… to pictures of your living room for use when you’re selling your house. And that advice is: remove clutter from your photographs! Take a look at this picture submitted for October’s photo contest: 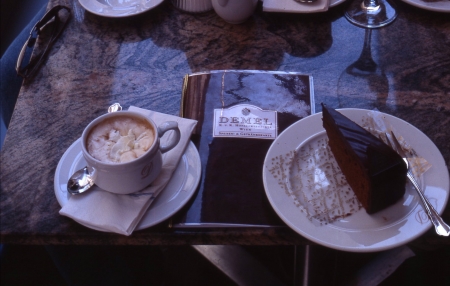 The photographer had the right instinct — he pushed away from him the sunglasses and the other plates and glasses on the table leaving just the coffee, cake, and menu as his focus. The problem is, though, he didn’t completely remove the clutter from the photograph. Instead, you can still see it there, lined up at the top of the photo. Even the reflection of the wine glass on the table is distracting — and I bet this photographer didn’t even notice that reflection when he took this shot. The truth is, it’s tough to train yourself to notice the abandoned soda can in the middle of your romantic beach shot… the trash on the side of your landscape shot… or Aunt Elda’s elbow on the table when you’re trying to take a picture of your daughter blowing out the birthday candles. It sounds easy. But trust me, the ability to do it by habit is the one distinct skill that separates an amateur from a pro.
Photo Composition Tip: How to Remove Clutter From Your Photographs
1. For starters, when you have a topic or theme to follow, you want to make this the center of interest in your image. In this case, it should be the coffee and maybe the menu with the chocolate cake. Note: The center of interest doesn’t mean the center of your photograph. Don’t confuse the two. The center of interest simply means that it’s the dominate subject in your photograph. Focus on your center of interest and do whatever it takes creatively to capture it. Eliminate everything else. 2. Train yourself to notice more. What I mean is when you’re about to snap a picture, quickly (and consciously) take stock of exactly what’s in your shot — look for trash or non-related objects that will take away from the beauty and focus of your photo and then compensate for them. Move. Change angles. The photographer who took this shot we’ve been talking about got it almost right… but not quite. And the photo is weaker for it. Taking the extra time to focus your attention on your subject makes a world of difference. Now, this photo could have been cropped using Photoshop, sure. But it’s always better to get the shot right in the first place, as you don’t lose any image quality that way. 2. Once you’ve chosen your subject and removed clutter from your photograph, select a vantage point where you can shoot this element to enhance it or create an angle to move the viewer’s eye through the image. That means if you can’t move the wine glass, try shooting the table from another angle so that the wineglass is no longer in the shot. And when you’re composing in the frame, whichever direction you shoot from, don’t crop out or come too close to any of the critical elements that make the photograph look good. For example, the plate and fork to the right of the image are cropped at the very edge, leaving no room for the editor to crop or arrange to his payout. ENTER TO WIN! For more information about our Photo contest click here and enter to win. First-time users should register first on the “register” link on the right side bar. Once you have a username and password, click “Enter to Win” to upload your photos. Only one photo per applicant will be considered. [Editor’s Note: Learn more about how you can turn your pictures into cash in our free online newsletter The Right Way to Travel. Sign up here today and we’ll send you a new report, Selling Photos for Cash: A Quick-Start Guide, completely FREE.]
Travel Photography Resources
5 Dos and 2 Don’ts for Travel Photography
Take Great Photos And Get Paid More For Your Travel Articles
Turning a Photography Hobby into a Monthly Income
The Pros Of Selling Your Images As Stock Photography
16 Mobile Photography Tips And Tricks Every Photographer Should Know
