Are you a brownies-with-walnuts kind of person, or a brownies-with-NO-nuts kind of person?
When you set your camera to shoot in RAW, the images you get out of it are unfinished, like un-baked brownie batter. But all of the “ingredients” are there and you can adjust them as much as you want in a processing program like Lightroom. Your final product looks exactly how you want it to look.
But if you set your camera to shoot in .jpg, the images are already finished — like baked brownies. The photos “pop” more than RAW images do. But your camera did all of the decision making for you. If they’re too bright, too dark, or the color balance is off… it’s too late.
The thing is, you CAN process a .jpg image. But you can’t do as much with it as you can with a RAW image.
For example…
Here’s how an un-processed RAW image and .jpg image look, side-by-side:
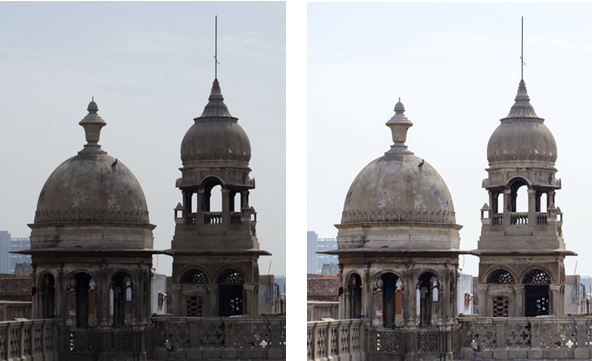
The RAW image, on the left, is darker and has less color and contrast than the .jpg.
But they both have the same major issue. Overall, they’re both gray and uninteresting.
If I take the RAW image into Lightroom, I can fix the sky, as well as the overall exposure and contrast, to make it look like this:
Yowza! That’s better.
But I can’t fix the sky on the .jpg image, because the data is lost. Those brownies are already baked.
I can up the contrast and the saturation, but processing a .jpg image will introduce issues like compression much more quickly than it will with a RAW image. If you’re shooting for fine art, that might be ok. But for stock, an image with compression issues will get rejected.
When you make your own brownies, you get to choose if they’re chewy with butterscotch… fudgy with macadamia nuts… or cakey with a hint of mint.
If someone else bakes them for you, it’s easier for you. But you’re stuck with whatever they like. You can’t add chocolate chips after the fact, or take out all the walnuts.
— Bonnie
Bonnie Caton
Creator, Breakfast Stock Club
P.S. Premium Members: I made you a quick video tutorial to show you how I got the RAW image above to look better in Lightroom. You’ll find it on your Premium Member Page, under the “Bonus” tab, here.
Your Weekly Breakfast Dish
The Latest from Your Breakfast StockClub Facebook Page
From Bill Broughton: Hello BSCers – I’m new around here and I’d like to introduce myself! My name is Bill Broughton and I’m building a second career around an old passion. I’m hoping to immerse myself in all that is BSC, learn from so many experts and contribute as I am competent to do so (and probably even when I’m not). I look forward to chatting, uploading, and participating in a few Challenges.
From Theresa St John: Last week I had an image bought on a stock site – for $22.00!!! And today I had one purchased for $15.75, Super happy about it – big difference from the .25 to a buck or two! :O)
From Buff Etheridge: Wahoo. I got this picture accepted at Dreamstime and it’s already sold once. That brings me up to 30 photos online with them. I’m going for 50 online so I can apply for Exclusive. It’s been an effort in slow motion, but it’s also been fun and low pressure and kind of exciting, even the single sales events. Thanks for all the community inspiration and support!!
From Retti Waara: I am amazed! I got a photo accepted on Stockimo, which is a platform for iPhone photographers to sell photos. It’s produced by Alamy. I picked up a copy of Photo District News at a bookstore because it was half price and had nice photos for inspiration for my photography. In the article “10 Mobile Apps every Photographer Needs”, it mentioned Stockimo. I take a lot of photos with my iPhone (in a waterproof case) when I’m kayaking, since my camera isn’t waterproof, so I decided to upload one on a whim – it was accepted! Just maybe it will sell… I hadn’t signed up for any stock agencies yet because I’m still trying to figure out my camera and Lightroom folder system. So – I am motivated to get going now and just do it.
Travel Photography Resources
5 Dos and 2 Don’ts for Travel Photography
Take Great Photos And Get Paid More For Your Travel Articles
Turning a Photography Hobby into a Monthly Income
The Pros Of Selling Your Images As Stock Photography
16 Mobile Photography Tips And Tricks Every Photographer Should Know
