I’ve been talking a lot this week about food photography and getting better food shots. So today, I’d like to share with you a little tip I picked up at one of our last photo workshops. But first, let’s go over two things that are important to understand before you can use this tip: depth of field and selective focus. When it comes to photographing food, professional photographers often like to experiment with depth of field. Depth of field is the distance between the nearest and the farthest objects that appear to be in focus in your photograph. In landscape photography, for instance, you may want the flowers in your foreground to be in sharp focus as well as the mountains several miles away in the background. When everything in the photo is in focus, from a long distance away to right up close, you have a very large depth of field. At the other extreme would be a picture with a very shallow depth of field. To better understand shallow depth of field, take a look at the focus in these two food photographs…

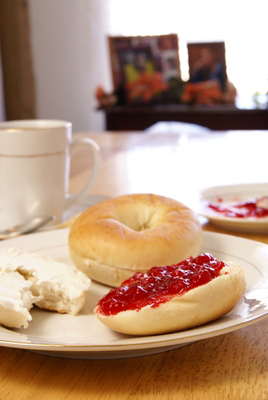
Notice in the first photo how the pastry is in sharp focus but the spoon and the cup right behind and beside it are blurred. And in the second photo how the bagel and jelly are in sharp focus but the pictures and picture frames on the counter behind it are so blurred they’re unrecognizable. This is done with a technique called selective focus. Selective focus reduces the zone of acceptable focus in your image throwing your foreground, your background, or both out of focus. Your selected object remains in focus, becomes isolated, and is highlighted as the point of interest. In food photography, this is great because you often have a lot of other distractions around your food that you don’t want to detract from your subject — other items on the table, other patrons sitting at the table next to you, etc. How much you blur the foreground and/or background depends on how isolated you want your subject to appear… and how unrecognizable you want the surroundings to be. My tip for you today, though, is one that will help you remember your camera settings if you have a digital SLR camera and you want to experiment with selective focus… This is a tip I picked up at one of our live photo workshops from an attendee. He said: Do you want 2 things in focus or 22? Meaning, do you want a very shallow depth of field with just two things in focus: a bagel and your plate? Or do you want a large depth of field with 22 things in focus — your plate plus the plates on the table next to you? If you want just a small number of things in focus, use a small f-stop number like f2.0 or f2.8. If you want a lot of your picture in focus, use a higher f-stop number like f22. Now clearly I don’t mean that f2.0 and f22 are the best settings for experimenting with depth of field. It’s just a simple way to remember that if you only want a few things in focus in your photo — with the background and foreground out of focus — then use a low f-stop number. Higher f-stop numbers are used for larger depth of field. Point and shoot users can try experimenting with selective focus by putting their camera in Portrait Mode. The closer you can get to your subject and the farther the background is away from it, the more blurred effect you’ll see. — Lori Lori Allen Director, Great Escape Publishing P.S. Both of the photographs in this e-letter were taken by Turn Your Pictures Into Cash graduate, Kathy Burns-Millyard and are now up for sale on Shutterstock.com. Read an interview with Kathy where she reveals how she sells her photos as stock in our e-letter archives, here. [Editor’s Note: Learn more about how you can turn your pictures into cash in our free online newsletter The Right Way to Travel. Sign up here today and we’ll send you a new report, Selling Photos for Cash: A Quick-Start Guide, completely FREE.]
Travel Photography Resources
5 Dos and 2 Don’ts for Travel Photography
Take Great Photos And Get Paid More For Your Travel Articles
Turning a Photography Hobby into a Monthly Income
The Pros Of Selling Your Images As Stock Photography
16 Mobile Photography Tips And Tricks Every Photographer Should Know
