Last week we took a look at adjusting underexposed photos in Photoshop with Levels and Curves. As promised, today we’ll look at the Lightroom rescue remedy for those underexposed shots… The first thing you will have to do is import your photo into Lightroom (for instructions on how to do that click here). I’ve chosen a couple other shots from this month’s challenge to work with. Let’s start with this great action shot… has it got story or what?  Once the shot is imported in Lightroom, you’ll want to open it in the “Develop” module.
 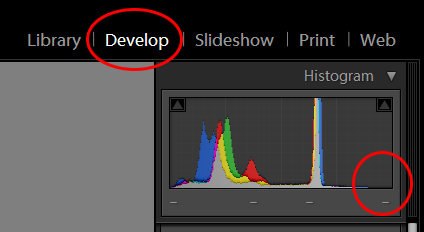 At the top of the screen, you’ll see the histogram, and right away you can tell the shot is somewhat underexposed (since most of the peaks on the histogram are to the left, and there isn’t anything to the right, where it’s circled above). The histogram should generally cover the whole range from light to dark. So, the first thing I would do for this photo in Lightroom would be to adjust the tone. For this, I go down to “Exposure” and move the slider to the right a bit — in this case around +.85. I never like to adjust the exposure to either extremity, and all adjustments should be done with a “gentle hand.” See the area between the two red lines below:
 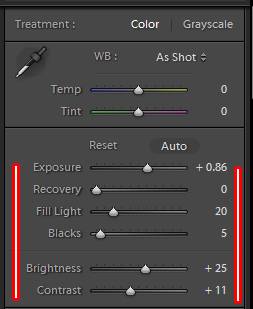 Then I add just a touch of “Fill Light.” Here I move the slider to 20. I darken down the blacks just a touch with a slide to 5. Then I drop down to “Brightness” and put in a little more light by sliding it up to +25 and bump up the contrast just a tad with a +11. Remember, this is just an example. When adjusting your own photos, don’t follow these numbers exactly. Look at the photo as you work the sliders to see where it looks just right. This way, little by little, you have a lot of control over the areas you are lightening and darkening while you maintain or increase the brightness and contrast. The last step I would take for this photo is to adjust the “Tone Curve.” Just like last week in Photoshop with the “curves adjustment layer,” I would raise the highlights a little and drop the dark areas. You can do that by clicking and dragging along the Tone Curve line, about where I circled it here. Drag the upper part up a little more and the lower part down a little. These should be very slight adjustments.
  Before and After:
 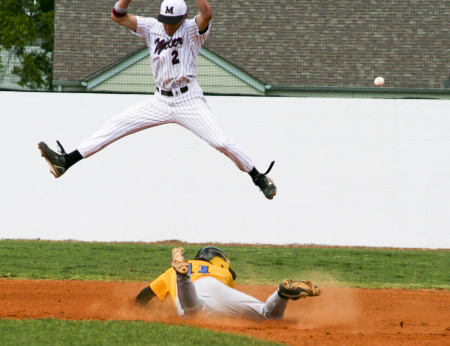 Here is one more shot I took from this month’s Photo Challenge…
  Again, import the image into Lightroom and open it in the Develop module. Here’s the histogram for this photo:
 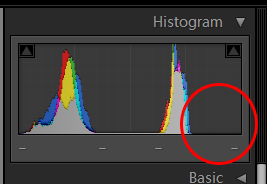 Notice how far in from the right it is? But notice also that the dark areas, or the blacks that are to the left of the histogram, are not “blocked up.” They’re not all the way to the left — meaning this image has a full range of detail, which is good. That detail just needs to be pulled out of the image for best impact. So, again, start with the Exposure slider. As you move it to the left, notice what is happening with the histogram — it is moving more to the right as well. Remember to make easy adjustments. I usually don’t like to adjust exposure more than +1.00. In this case, I go to +.95. I adjust the other sliders here also: fill light to bring out a bit more of the shadow details, and a blacks adjustment to bring the histogram to the edge on the dark side. The image still has a way to go before the histogram is covering the whole light to dark spectrum, so I adjust the brightness and the contrast as well. And I do the same as before with the “Tone Curve.” What I notice now, though, is that the image seems to have a funny color cast – it’s a bit cyan looking. Remember last week I adjusted the color cast in Photoshop with the eye-dropper in the curves box? You can do the same in Lightroom. Look just below the histogram – there you will see an eye-dropper (see it circled in the image, below). You can try the eye-dropper by finding an area that should be middle gray and clicking. It’s a bit tricky to learn and takes a little practice. But experiment as much as you want — in Lightroom, remember, you don’t risk changing the original photo. Notice also, when you’re moving the eye-dropper around on your image, the thumbnail to the left is changing colors. This is giving you a preview of what the image would look like if you clicked there. The other option you have is to click on the white balance drop-down button (to the right of the eye-dropper, where it says “custom”). If you’re shooting in RAW, you have several preset lighting options to choose from. You can roll through them and see if any of those do the trick, but my general preference is to use the eye-dropper since you have more control.
 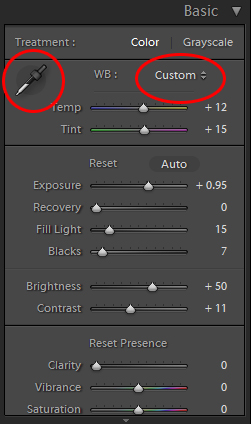 Now, having made the color adjustment, I check the histogram one last time to be sure it’s okay and I don’t need to make any last-minute tweaks on my previous adjustments. Before and After:
 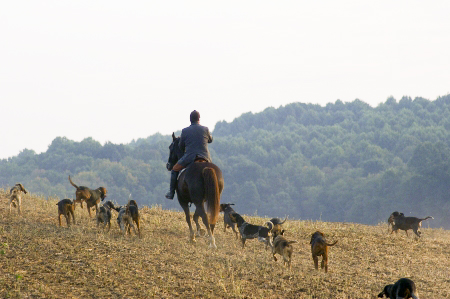 Remember to use a gentle hand with all your adjustments – and have fun playing around in there! ENTER TO WIN! This month’s photo challenge theme is Game On. If you have a picture to submit, log on to our website and click on the “Enter to Win” tab. (Note: First-time users need to register on the “register” link on the right side bar first. Once you have a username and password, click “Enter to Win” to upload your photo. Only one photo per applicant will be considered. No purchase necessary to register.) Photos are due by 8:00 a.m. EST, Monday, May 26, 2008. [Editor’s Note: Learn more about how you can turn your pictures into cash in our free online newsletter The Right Way to Travel. Sign up here today and we’ll send you a new report, Selling Photos for Cash: A Quick-Start Guide, completely FREE.]
Travel Photography Resources
5 Dos and 2 Don’ts for Travel Photography
Take Great Photos And Get Paid More For Your Travel Articles
Turning a Photography Hobby into a Monthly Income
The Pros Of Selling Your Images As Stock Photography
16 Mobile Photography Tips And Tricks Every Photographer Should Know
