The ghost town stood dusty and desolate… too desolate.
Of course, the Bonanza Creek Ranch — where we held one of our photo shoots last weekend in Santa Fe — is supposed to look rough and deserted. It’s the Old Western movie set where they filmed Silverado, Lonesome Dove, Walker, Texas Ranger, and dozens of other titles.
However, one very important element was missing from our shoot: our female models. They didn’t show.
But that didn’t stop us. And an unexpected hiccup like that shouldn’t stop you, either. No matter how inconvenient the situation is — maybe it’s pouring when you expected sun — you can always snap creative photos and get some much-needed practice with your equipment.
Here are a few things we did — and learned — to get some great shots (and experience) even in a less-than-perfect situation.
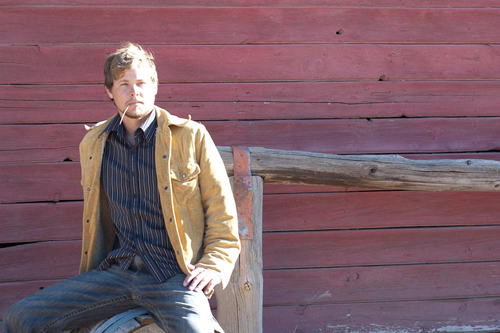
PROBLEM #1: “The girls” didn’t show up. We had a couple of male models. But we’d split our large group of attendees into smaller groups, and so only two had models at a time. The rest of the groups had to find something else to shoot.
** Solution: Shoot what you have around you. People photos sell well as stock. But so do details, textures, landscapes, and other subjects. So we focused our attention there.
** Lesson: Practice your composition. Professional stock photographer Lise Gagne reminded us to frame our shots to include plenty of copy space if we wanted to sell them for stock. (Like in this shot of an old dilapidated wheelchair, below.)
 PROBLEM #2: It was really sunny (no conveniently overcast sky)… and so the buildings cast very harsh shadows.
** Solution: Practice thoughtful shooting. Slow down to look at your image. And take the time to set your camera right. When you move to a new spot — check again. The light changes. You may need to change your settings, too.
** Lesson: As we photographed the things around us, Lise kept reminding us to stop and look at our images. Check the histogram. Check the blinking highlights. Ask yourself: Is this properly exposed? Slow down and make sure your images are coming out right. You don’t want to shoot all day only to find out later that everything is overexposed.
Take a look at the two photos here. The first is over-exposed. The right side of the model’s face is blown out. If this photographer hadn’t stopped to check the images, she could have ended up with a day’s worth of unusable shots. But with a little tweaking, the exposure improves. The second image here is beautifully lit.
PROBLEM #2: It was really sunny (no conveniently overcast sky)… and so the buildings cast very harsh shadows.
** Solution: Practice thoughtful shooting. Slow down to look at your image. And take the time to set your camera right. When you move to a new spot — check again. The light changes. You may need to change your settings, too.
** Lesson: As we photographed the things around us, Lise kept reminding us to stop and look at our images. Check the histogram. Check the blinking highlights. Ask yourself: Is this properly exposed? Slow down and make sure your images are coming out right. You don’t want to shoot all day only to find out later that everything is overexposed.
Take a look at the two photos here. The first is over-exposed. The right side of the model’s face is blown out. If this photographer hadn’t stopped to check the images, she could have ended up with a day’s worth of unusable shots. But with a little tweaking, the exposure improves. The second image here is beautifully lit.
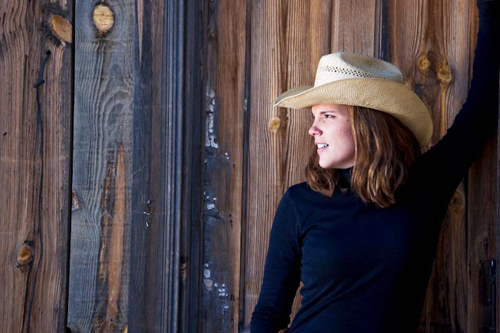 Before I move on to Problem # 3, I should explain who the girl here is. About half an hour into our shoot, we took Problem # 1 (the lack of female models) into our own hands. The Travel Division Staff (Jackie, Alice, and I – that’s Alice in the shot) strapped on chaps, donned cowboy hats, and stepped in as models — even though “Lady Stetson” isn’t exactly in our job titles…
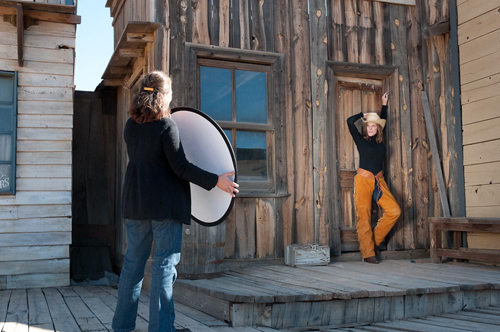
PROBLEM #3: Our group was now shooting lots of people in that bright sun I mentioned. And while natural light can prove wonderful for portraits, it can be tricky to manipulate. You get raccoon shadows under the eyes if you’re not careful or the tip of a nose in bright sun and the rest too dark.
** Solution: Use the natural light wisely — which means diffuse it and bounce it.
** Lesson: Pay attention to where you’ve placed your model and really watch the light on his or her face. One of the most important things we learned is to put your subject in the shade and use a reflector to light his or her face, as you see us doing here below. (More on that tomorrow.)
Before I move on to Problem # 3, I should explain who the girl here is. About half an hour into our shoot, we took Problem # 1 (the lack of female models) into our own hands. The Travel Division Staff (Jackie, Alice, and I – that’s Alice in the shot) strapped on chaps, donned cowboy hats, and stepped in as models — even though “Lady Stetson” isn’t exactly in our job titles…
PROBLEM #3: Our group was now shooting lots of people in that bright sun I mentioned. And while natural light can prove wonderful for portraits, it can be tricky to manipulate. You get raccoon shadows under the eyes if you’re not careful or the tip of a nose in bright sun and the rest too dark.
** Solution: Use the natural light wisely — which means diffuse it and bounce it.
** Lesson: Pay attention to where you’ve placed your model and really watch the light on his or her face. One of the most important things we learned is to put your subject in the shade and use a reflector to light his or her face, as you see us doing here below. (More on that tomorrow.)
 You can’t always expect to have the perfect photographic situation. Sometimes things just don’t go as you expect. Models don’t show up. The weather turns bad (or sometimes it’s too sunny). But as our pro instructors reminded us in Santa Fe, you’ll do a lot better as a photographer — and certainly end up with more shots — if you roll with what you’ve got.
— Bonnie
Bonnie Caton
Staff Writer, Great Escape Publishing
P.S. Tomorrow, professional photographer Shelly Perry will share her techniques for taking portrait photos in natural light. Her tips can help you retain control over your images, no matter what the light is doing outside.
P.P.S. Having an expert by your side when you’re shooting is great — our workshop attendees couldn’t get enough of it. But it’s pretty rare to have a resource like that at hand.
[Editor’s Note: Learn more about how you can turn your pictures into cash in our free online newsletter The Right Way to Travel. Sign up here today and we’ll send you a new report, Selling Photos for Cash: A Quick-Start Guide, completely FREE.]
You can’t always expect to have the perfect photographic situation. Sometimes things just don’t go as you expect. Models don’t show up. The weather turns bad (or sometimes it’s too sunny). But as our pro instructors reminded us in Santa Fe, you’ll do a lot better as a photographer — and certainly end up with more shots — if you roll with what you’ve got.
— Bonnie
Bonnie Caton
Staff Writer, Great Escape Publishing
P.S. Tomorrow, professional photographer Shelly Perry will share her techniques for taking portrait photos in natural light. Her tips can help you retain control over your images, no matter what the light is doing outside.
P.P.S. Having an expert by your side when you’re shooting is great — our workshop attendees couldn’t get enough of it. But it’s pretty rare to have a resource like that at hand.
[Editor’s Note: Learn more about how you can turn your pictures into cash in our free online newsletter The Right Way to Travel. Sign up here today and we’ll send you a new report, Selling Photos for Cash: A Quick-Start Guide, completely FREE.]
Travel Photography Resources
5 Dos and 2 Don’ts for Travel Photography
Take Great Photos And Get Paid More For Your Travel Articles
Turning a Photography Hobby into a Monthly Income
The Pros Of Selling Your Images As Stock Photography
16 Mobile Photography Tips And Tricks Every Photographer Should Know
