Yesterday, I gave you some quick and dirty ways to get started taking professional-quality photos right away. If you missed it, you can read it here. The point is: you don’t have to travel to start selling photos. And you don’t need any fancy equipment to get started, either. Here, below, professional photographer Jani Bryson shows you how to take pro-quality, saleable photos of small objects using a simple milk jug… Have a great weekend! — Lori Lori Allen Director, Great Escape Publishing P.S. Next week, I’ll send you a “quick and dirty” way to start selling your photos. Marketing and selling your photos is something we’ll be going into more in depth this May in Paris with professional photographer Rich Wagner. Find out about our next workshop or expedition here! ************************ April 4, 2009 The Right Way to Travel ************************ PHOTOGRAPHING SMALL OBJECTS LIKE A PRO… ON A BEGINNER’S BUDGET By Jani Bryson in Kansas City Do you think capturing beautiful photos of products and small objects is impossible without an expensive studio setup? Think again! Your photographs of Grandma’s spoon collection and little Johnny’s action figures can rival those you’ve see in magazines — and you don’t have to buy expensive equipment to make it happen. As with all photography, the key to capturing great photos of small objects is in understanding light and how to control it. Have you ever been disappointed by photographs you’ve taken outside on a bright sunny day? Perhaps the shadows were harsh and dark, creating undesirable effects in you images. If you’ve ever stopped to think about it, you’ve probably noticed that photographs taken on a cloudy day almost always turn out well. The reason for this is that clouds soften and diffuse harsh sunlight. Professional photographers understand that this is the key to soft, beautiful photographs, so whether outside or in the studio, they will endeavor to in some way diffuse strong lighting. When shooting in the studio, there are many types of modifiers that you can use with professional studio lights. When shooting outdoors, professional photographers also have an arsenal of tools they use to diffuse the harsh rays of the sun when necessary. You’ll be pleased to know, however, that high quality photographs can actually be achieved without expensive professional light modifiers. The only requirement is that the photographer diffuse the light in some way. Here’s a sneaky little trick you can use to diffuse and soften any kind of light when photographing small objects. It’s called a do-it-yourself light tent — it’s portable, it’s recyclable, and it’s free! This is what you’ll need for your light tent:
- An empty, clean one-gallon plastic milk jug
- A craft knife
- A camera lens that will let you focus very close to an object (if you have an SLR camera this probably means using a macro lens, but most point and shoot cameras will allow you to focus within a few inches of an object)
- A light source
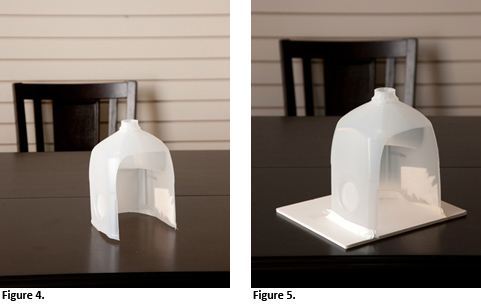
The first thing you’ll need to do is to cut the entire bottom out of the milk jug with the craft knife. Also, if necessary, remove a portion from the top of the jug just large enough to insert your camera lens. Place the jug on top of the object you are going to photograph. I chose a black table as the surface for my sample, but you can vary the color and texture of your photo’s background by selecting a different surface. Get creative with your surface and experiment using different fabrics, colored paper, and natural textures such as cement or sand.

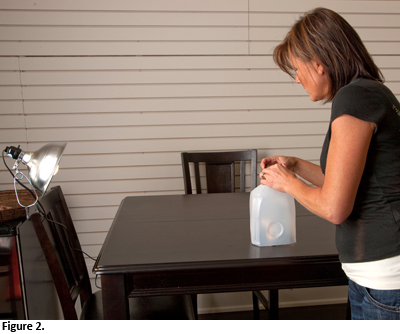
Shine a strong light source at the object from outside the milk jug. Direct sunlight, either indoors or outdoors will work, as will a table lamp, a desk lamp, or a clamp-on lamp from the hardware store. ** TIP: If you choose to work with a lamp indoors, it’s best to use a “Daylight” bulb, as a regular light bulb will give an undesirable yellow cast to your images. Insert your camera lens into the top of the milk jug and snap your picture (Figure 2). Hint: If you are using a point-and-shoot camera, be sure to disable the camera’s flash.
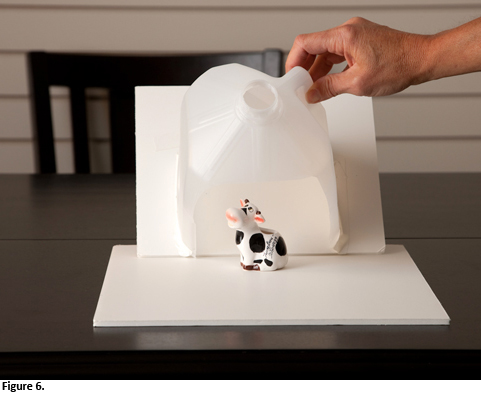
You can vary the perspective by cutting the side out of a milk jug (Figure 4), and taping a “backdrop” over the missing bottom of the milk jug (Figure 5). Choose your surface and place milk jug over object (Figure 6).
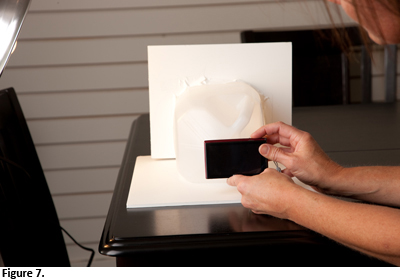
You will then shoot from the side (Figure 7).
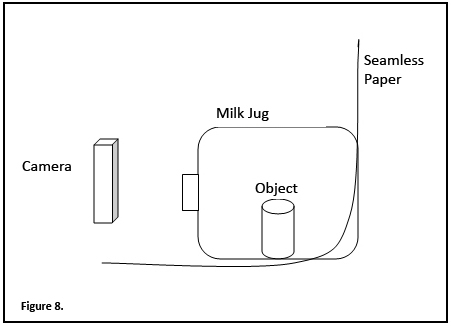
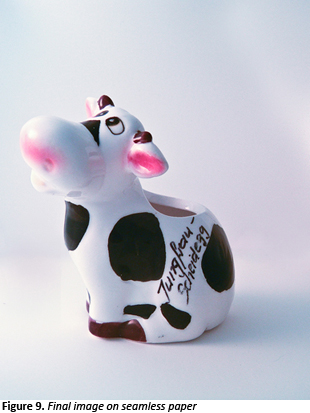
Try adding several light sources for effect. Play with different backdrops and different surfaces. You could even try the seamless paper effect (Figure 8), which would allow you to achieve the classic “isolated” effect (Figure 9).
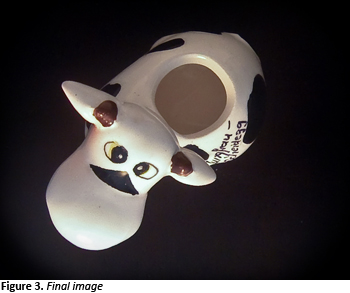
Got milk? Then, with a little ingenuity, you too can capture professional looking photographs of small objects. [Editor’s Note: Learn more about how you can turn your pictures into cash in our free online newsletter The Right Way to Travel. Sign up here today and we’ll send you a new report, Selling Photos for Cash: A Quick-Start Guide, completely FREE.]
Travel Photography Resources
5 Dos and 2 Don’ts for Travel Photography
Take Great Photos And Get Paid More For Your Travel Articles
Turning a Photography Hobby into a Monthly Income
The Pros Of Selling Your Images As Stock Photography
16 Mobile Photography Tips And Tricks Every Photographer Should Know
