Often you must resize your digital images for use in publications or on websites. Sometimes the buyer will give you very specific instructions about what to send. But if you don’t have that guidance, here are the rules of thumb I rely on:
For print media (magazines, newspapers, newsletters) — Deliver electronic images at 300 dpi (dots per inch) and at a minimum of 8 x 10 inches (click here for my article on how to send pictures to an editor).
For electronic media (websites, e-zines) — Deliver electronic images at 100 dpi. Web images vary in size when posted online, but by delivering your pictures at 8 x 10 inches, you’re supplying a web designer with an image he can easily manipulate.
Now, you can resize your images using almost any photo-editing software and through some email programs as well. Here I will show you how to do it six different ways, using:
* Adobe Photoshop CS3(tm) * Adobe Photoshop Lightroom(tm) * Adobe Photoshop Elements(tm) * Google Picasa2(tm) * Microsoft Office Picture Manager(tm) * Microsoft Outlook 2003 and 2007(tm)
You can capture and edit your digital images in a number of different formats. The JPEG format is the most common one used for publishing, so that is what I will focus on here.
However, if you find you need to resize another type of file — like a TIFF, for instance — you will need to use an editing program like Photoshop to do it. (The process, you’ll find, is similar to that you use to resize JPEGs, which I’ll explain below.)
Before I walk you through the resizing process for each software package, I want to emphasize one very important thing…
Always Make a Copy
Always, always, always… always make a copy of the image that you are about to resize.
In fact, you should always make a copy of your original image, even before you edit it. Then, once you’re pleased with your edited image, make a copy of that before you resize it.
This is important because when you downsize an image you’re arbitrarily removing pixels from it. As a result, it’s impossible to restore a downsized image to its original quality. So again: Make a copy before you start fiddling. And fiddle with the copy.
Digital Photography Tip: Resize Using Photoshop CS3
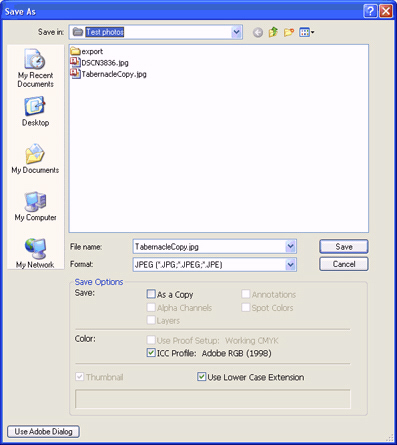
Photoshop CS3 is a powerful photo-editing program that gives you several options for resizing images. The quickest and easiest method is to use the Save As function. After you have created a copy of a JPEG image you want to resize, open the Save As window by clicking on Save As in the File pull-down menu as shown in the picture below. A window like this one will open:

Before clicking the Save button you will need to rename the file by typing in a new file name in the File name text box, or click the As a Copy box in the Save Options area. If you do not perform this step, CS3 will ask you if you want to replace the file — you don’t. You want to Save As something new. So give the file a new name, and click on the Save button.
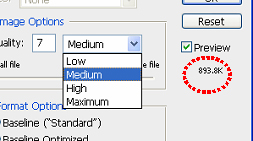
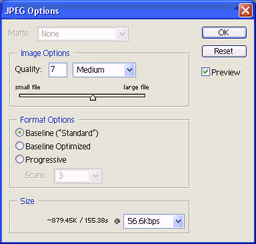
The JPEG Options window will appear after you’ve clicked the Save button. In this window, you’ll be able to change the resolution of the image. The resolution and file size of your image will change when you adjust any of the settings in the Image Options section of the window. The current image has a file size of 9.3 MB (megabytes). I want to resize the image to approximately 1 MB or smaller. So I used the pull-down menu to set the resolution to Medium. Note that the file size is now 893.8 K (kilobytes), approximately 10 times smaller than the previous file.
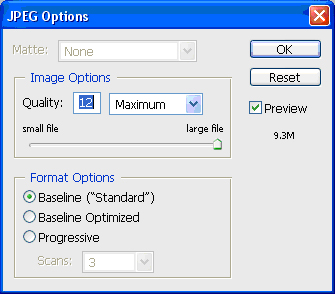
CS3 has arbitrarily removed pixels to create a smaller file. Only the resolution was changed. The actual dimensions of the image are the same.
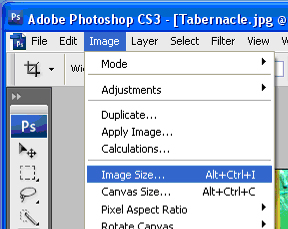
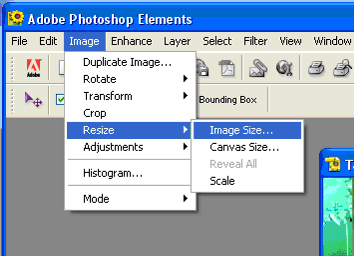
Another way to resize your photos (a bit more precisely) is through the Image Size function. Start by selecting Image on the toolbar and then click on Image Size, as shown in the illustration below. The Image Size window will open, as shown on the second illustration down.
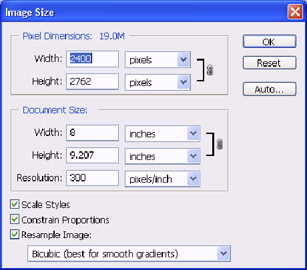
The current image is approximately 8 x 9 inches with a resolution of 300 pixels per inch. The current file size (not displayed), is over 9.3 MB, which is too large for some email systems and web use.
I want to downsize the resolution to 100 pixels per inch and the editor has told me that the image should be around five inches wide.
To change the resolution, I simply entered the new resolution number in the Resolution text box (shown below). To change the width, I entered 5 in the Width text box. Now, click on the OK button to change the size of the image. The changes are not permanent until you save the image.
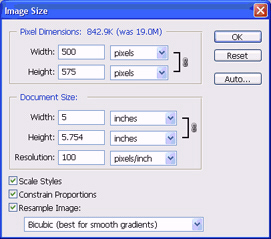
The image file is now approximately 900 kilobytes (KB), which is 10 times smaller than the original file.
In addition to the methods described above, Photoshop CS3 also has a Save for Web and Devices function that is available under the File menu. This method, while more complex, is worth exploring as well.
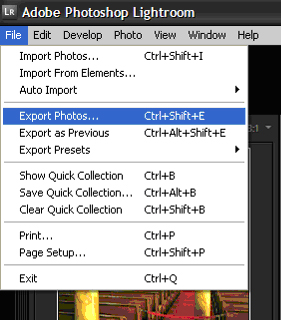
Digital Photography Tip: Resize Using Photoshop Lightroom
In Lightroom, you can resize images using the Export Photos function. However, there are several ways to export an image.
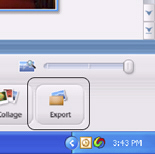
In the Library mode, click on the Export button at the bottom of the page.
In the Develop mode, select Export Photos from the File pull-down menu, as shown in the picture below.
In both modes, the Export window will open as shown below.
The Export function is intended for single image or batch processing (multiple images), so make sure that you have selected the correct image(s) for export.
Note that you have several options to choose from.
First, select the destination folder for the resized photos in the Export Location box at the top of the window.
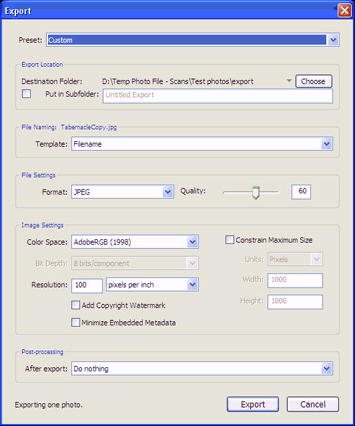
In the File Settings box, set the Format to JPEG and Quality to 60 or 80. Since the original image is over 9.0 MB, I am setting the Quality to 60, which will yield a new file of approximately 900 KB, or 10 times smaller.
Finally, set the resolution to 100 pixels per inch (ppi, which is the same as dpi) and click the Export button.
Digital Photography Tip: Resize Using Photoshop Elements
The resizing process in Elements is very similar to that in Photoshop CS3. You use the same steps in the Save As method as I described up top in the instructions for CS3. (Note that the JPEG Options window is slightly different in that it displays the file size at the bottom of the window instead of on the right side.) Otherwise, the interface will look the same and you perform the same steps.
Again, as with CS3, you can also resize your images using the Image Size function. In Elements, it is displayed in the Image pull-down menu as Resize, as shown in the illustration below. Select Image Size… from the secondary pull-down menu. Once you’re there, you’ll find that the Image Size window functions the same way it does in CS3.
In addition to the methods described above, Elements also has a Save for Web function available under the File menu. Again, this method, while more complex, is worth exploring.
Digital Photography Tip: Resize Using Picasa
Picasa is a basic photo organizing and editing program that can also resize your photos. You can choose from two functions in Picasa to resize, export, and email images:
* The Export method reduces the image resolution and quality of a JPEG image. * The Email method just reduces the number of pixels in the image, thereby reducing the resolution.
Here’s how to navigate the Export function: Start by selecting the image that you want to resize and clicking on the Export button in the lower left corner of the Picasa window to open the Export to Folder window shown below.
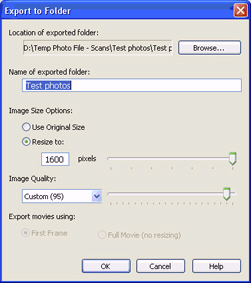
Select the location where you want the exported file to go.
Under Image Size Options, click the Resize to button and adjust the slider. In this instance, I have selected the maximum size of 1600 pixels. This number represents the longest dimension of the image. Now set the Image Quality. I like to control the quality, so I have selected Custom from the pull-down list and have set the slider to 95.
The other settings yield the following: Automatic preserves the original image quality; Normal balances quality and size; Maximum preserves fine detail for large file sizes; and Minimum yields some quality loss in small file sizes.
Click the OK button to export and resize your file. A new window will open that displays the location of the exported image. Using the setting described above, I resized a file from over 9 MB to 900 KB.
Here’s how to navigate the E-Mail function: You can also use Picasa’s E-Mail function to resize your photos. (I find this a less-desirable method than the first as it doesn’t give you instant feedback about the changes you’re making. Some trial and error is necessary to resize an image to the specific size you’re looking for. However, once you understand the process, it is simple and quick.)
This function severely restricts the size of an image, but it can be useful if you simply want to send small images to an editor for review. (Once the editor has chosen the images he wants, you’d have to resend those photos at the proper specifications.)
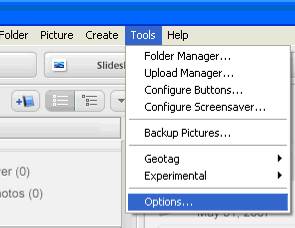
You begin by going to the Tools menu and clicking on Options. That will open the Options window shown below. Select the E-Mail tab at the top of the window.
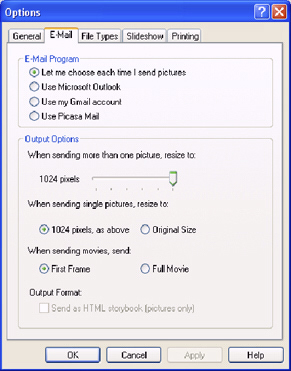
You now have the option of selecting an email program from the tabs across the top of the window and setting your Output Options. I have moved the resize slider to its maximum position and I have set the single picture setting to the same setting as above. Click the Apply button and the OK button to change the settings permanently.
When you click the Email button at the bottom of the Picasa window, it automatically creates a new message and attaches the resized image to it.
I do not recommend you select the Original Size option in the Output Option box. You can send a full-sized image, but doing so severely restricts your options for resizing.
Digital Photography Tip: Resize Using Microsoft Office Picture Manager
Picture Manager is included in the Microsoft Office suite of applications for Windows XP and later. It is a (very) basic image-editing program. It replaced Microsoft Photo Editor. If you have Office, you’ll find it in the Windows Start menu under All Programs/Microsoft Office/Microsoft Office Tools.
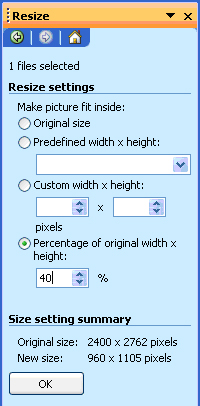
Start by selecting and highlighting an image that you want to resize. Go to the Picture pull-down menu (on the toolbar) and click on Resize to open the Resize window shown below. Note that there are several options for resizing your image. An easy option is to select Predefined width x height. I like to have more control over the size of the image, so I have selected Percentage of original width x height and entered 40 in the text box. Click on the OK button when you are done.
The image will not be resized until you have saved it. Save the image by clicking on the disk icon, circled on the illustration to the right.
In this instance, a 9 MB file has been resized to just over 900 KB.
You can email images directly from Picture Manager and you can also automatically insert a small version of the image in the body of the message.
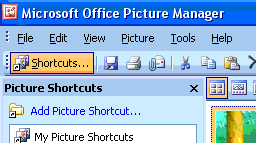
Start by highlighting the image(s) you want to email and click on the email icon, as shown in the first illustrated below. An E-mail window will appear, similar to the one illustrated below.
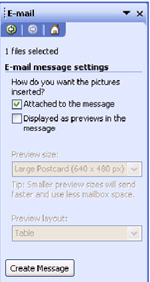
The photo(s) that you selected will automatically be attached to the email if you check the Attached to the message box. You can insert a small version of the attached image in the body of the message by checking the second box for Displayed as previews in the message. You can also set the size of the preview image. Create the email by clicking on the Create Message button.
Your image will be automatically attached to a new email message. If you checked the preview box, an image will be inserted in the body of the email in addition to the attachment. Simply complete the necessary fields in the email and send.
You can also use Picture Manager’s Export function to resize an image. The Export function is located in the File pull-down menu.
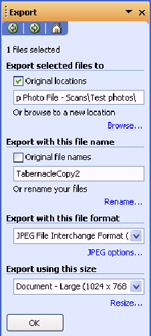
After opening the Export window, start by selecting where the image will reside. If it is going to be in the same file as the original, check the box next to Original locations. Next, rename the file or check the box next to Original file names.
If you check both the Original locations and Original file names boxes, you will be asked if you want to replace the existing file when you click the OK button. You can avoid this problem if you place the exported image in a different file folder or rename the file.
Select a preset export size from the Export using this size pull-down box, or click the word Resize… to open the Resize window illustrated earlier. Change the image size and click Return to Export. Click the OK button to complete the export process.
Digital Photography Tip: Resize Using Microsoft Outlook 2003 and 2007
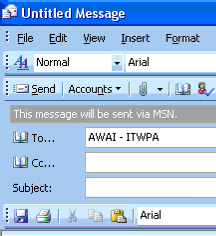
You can resize images as attachments to Outlook email messages if you’re using Outlook 2003 or 2007. Start by creating a message. Click on the paperclip icon to create an attachment and select the image to be attached from the Insert File window.
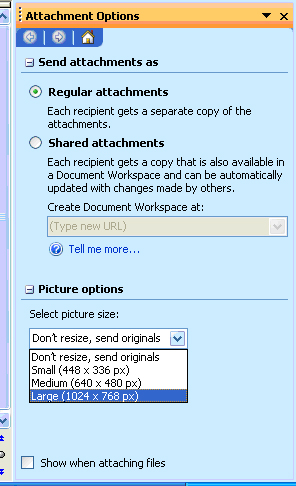
After attaching the image, click on the Attachment Options… icon to the right of the attachment text box as illustrated below.
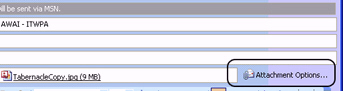
Select the preferred picture size from the pull-down list in the Picture options box. In this instance, the original image size is more than 9 MB. I am selecting the Large (1024 x 768) size from the pull-down list, which will resize my image to approximately 100 KB.
When you are finished with the Attachment Options window, click the Send button to send the message. The program automatically resizes the attachment.
[Editor’s Note: Learn more about how you can turn your pictures into cash in our free online newsletter The Right Way to Travel. Sign up here today and we’ll send you a new report, Selling Photos for Cash: A Quick-Start Guide, completely FREE.]
Travel Photography Resources
5 Dos and 2 Don’ts for Travel Photography
Take Great Photos And Get Paid More For Your Travel Articles
Turning a Photography Hobby into a Monthly Income
The Pros Of Selling Your Images As Stock Photography
16 Mobile Photography Tips And Tricks Every Photographer Should Know
