Over the years, we’ve collected a number of travel tips that I’ve shared with you in this e-letter. Tips like how to save wet electronics with rice… how to remove lint with airline luggage tags… and how to get free upgrades on rental cars. So it’s become a tradition that we count down to the New Year with a travel tip-a-day where I share our latest finds. For the next 11 days, from now until New Year’s Eve, in lieu of your regularly scheduled e-letter, I’ll send you a short, useful travel or photography tip a day. We begin, below, with today’s tip on how to turn your bathtub into a mini photo studio… Enjoy! Lori Allen Director, Great Escape Publishing ****************************** December 20, 2010 The Right Way to Travel Holiday Travel, Writing, or Photo Tip # 1 ******************************* HOW TO TURN YOUR BATHTUB INTO A PHOTO STUDIO By Bonnie Caton in Portland, OR You may think the last place you want to take your camera is into the shower. But I beg to differ. You can use your (dry) bathtub as a mini photo studio to isolate small objects on white. This can work well either for stock photography or to photograph items for sale online. It’s pretty easy. All you need is a clean, dry bathtub, a camera, a small object, and a tripod. ** Step 1: Start with a clean bathtub. The point here is to isolate an object on white… not on white with grime. My favorite bathtub cleanser is Bar Keeper’s Friend. It quickly makes everything white, white, white. ** Step 2: Run a dry cloth over your bathtub to make sure you don’t have any leftover water droplets that will shine in your photos. ** Step 3: Put an object into your tub and take a test-shot, assessing for light and shadow. TEST SHOT:  As you see here, I have a lot of shadow at the base of my object. Check around your tub to see if you have an area without shadow. It turns out there is no place without shadow in mine. So I’ll have to get in close and exclude the shadow. You can also see in this shot that the light in my bathroom is a bit pink. So I’ll either need to correct for that in my camera, or afterwards in Lightroom. Something to watch for if you try this. ** Step 4: Set up a tripod. You want a bright white background. Without studio lights, that means you’ll need to shoot with a long shutter speed. In this case, it’s too long to hold the camera steady with my hands. To get a good, clean shot that’s in focus with a white background, put your camera on a tripod. Here are my next three shots, with progressively longer shutter speeds. The last one is the keeper.
 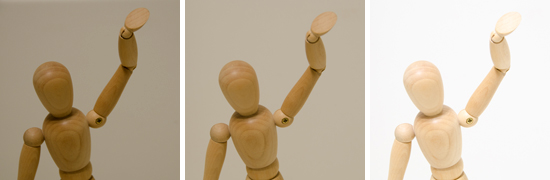 The cool thing about using your bathtub is that the light will be the same each time you shoot (unless you have big windows, in which case you can shoot at night for consistent results). For my last shot, here, I put my camera on ISO 100, aperture F8, with a 1.6-second shutter speed. Since the light will be the same next time, I know I can always use the same settings. And voila!
 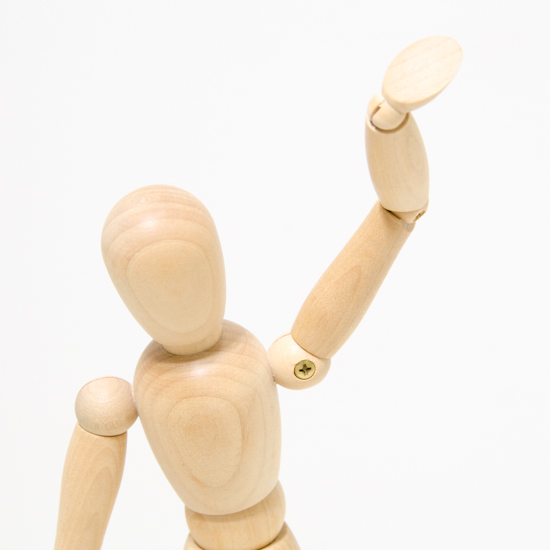 [Editor’s Note: Learn more about how you can turn your pictures into cash in our free online newsletter The Right Way to Travel. Sign up here today and we’ll send you a new report, Selling Photos for Cash: A Quick-Start Guide, completely FREE.]
Travel Photography Resources
5 Dos and 2 Don’ts for Travel Photography
Take Great Photos And Get Paid More For Your Travel Articles
Turning a Photography Hobby into a Monthly Income
The Pros Of Selling Your Images As Stock Photography
16 Mobile Photography Tips And Tricks Every Photographer Should Know
