Here in the Pacific Northwest, this holiday season brought us a winter wonderland. And, looking through the entries for this month’s Photo Challenge, I see it’s snowing all around the U.S., too. Venturing out with my camera to capture the snow, I was reminded of how tricky it can be to shoot for good results, so I thought I’d share with you one simple tip for getting better photos in snow… Obviously, we all know that snow is bright and white. Your camera, however, responds to the brightness by averaging everything out to give an overall “middle gray” picture. That’s why, with bright white snow, you’ll often end up with an under-exposed, or dark, photo. To compensate, tell your camera to over-expose. With snow, I typically over-expose at least one full stop and, sometimes, as much as two. Some factors that’ll determine how much you over-expose include the amount of snow in the shot, the time of day, and anything else of different shades and colors in the composition. Let’s take a look at a few snow examples from this month’s Photo Challenge… Here’s a shot where the frame is basically full of white snow and sky… but the white looks gray.  Now, there’s some subjectivity involved in all photography, of course, where personal taste and style play a major role… and snow is no exception. But, if the photographer wanted to get a brighter shot, telling the camera to over-expose will result in a more professional image… In this instance, the tree provided enough dark area that over-exposing by two full stops is too much, as it starts to lose detail. You’ll see what I mean in the following example, which I over-exposed by two stops:
 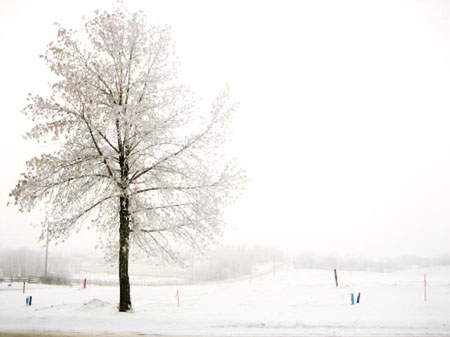 On the second attempt, I took it down to 1.5 stops, leaving the highlight details of the snow in place:
 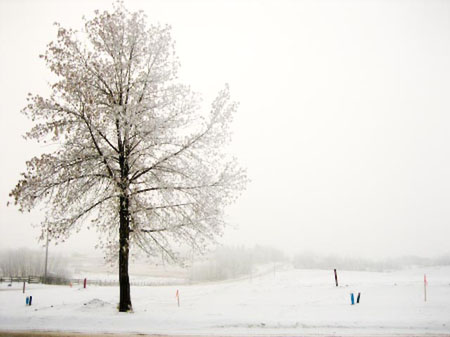 As I mentioned earlier, there’s always some subjectivity in how bright or dark you’ll want your shots to be. But simply learning how to understand your camera and using it to create the desired outcome is critical. Here’s an example of a shot of snow and a bright white house that incorporates other colors, tones, and shades. With these other shades present, the camera might have pretty accurately assessed this scene to give us correct exposure, or the photographer knew the exposure was being affected by all the bright snow and over-exposed a little. Either way, it worked to create this lovely shot:
 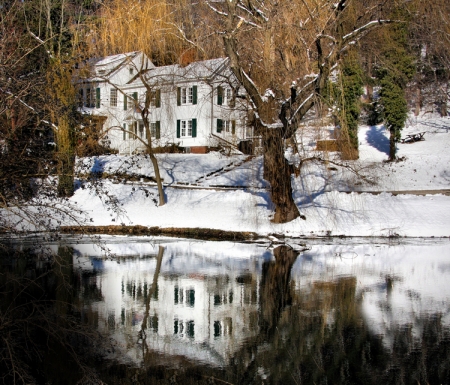 When shooting in snow, the general rule of thumb is to over-expose anywhere from one to two stops. And, if your camera has a mode specifically for snow, go ahead and use it — it’ll take the guesswork out for you. Have a wonderful new year! ENTER TO WIN! This month’s photo challenge theme is All That Glitters. If you have a picture to submit, log on to our website and click on the Enter to Win link in the right sidebar. First-time users need to register using the “register” link first. Only one photo per applicant, per month will be considered. No purchase necessary to register. Photos are due by 8:00 a.m. EST, Monday, January 5, 2009. [Editor’s Note: Learn more about how you can turn your pictures into cash in our free online newsletter The Right Way to Travel. Sign up here today and we’ll send you a new report, Selling Photos for Cash: A Quick-Start Guide, completely FREE.]
Travel Photography Resources
5 Dos and 2 Don’ts for Travel Photography
Take Great Photos And Get Paid More For Your Travel Articles
Turning a Photography Hobby into a Monthly Income
The Pros Of Selling Your Images As Stock Photography
16 Mobile Photography Tips And Tricks Every Photographer Should Know
