No matter where you’re submitting your images, it’s critically important to read and follow the guidelines. Any place that accepts photo submissions — whether it’s a newspaper, magazine, gallery, stock site, or contest — will have some specific requirements and you’ll get published more (and make more money for your photos) if you follow them closely. Admittedly, though, photographer’s guidelines aren’t always easy to understand. So let’s dissect some of the most important terms…
For example, take a look at these photographer’s guidelines taken from Grit magazine, a niche publication that focuses on rural living but also publishes food articles and photos: “When submitting [photos] via e-mail, send low-resolution images for review. If we select your images, we will ask you for high-resolution versions, to be emailed — one image per email — as jpgs with at least 300 dpi resolution, and as large as possible. Include complete caption and credit information…Payment for photos to accompany an article (other than courtesy photos) will be $25 to $200 per published photo…We are also looking for great stand-alone, 3/4-page to full-page photographs of life in the country. Payment will be $75 to $150 per published photo.” Let’s take a look at a few of the terms in these guidelines…
** Low-resolution images: What this typically means is 72 dpi (dots per inch), scaled down to about a 4×6 in size (that’s a general range, not exact measurements). An image this size is good for web preview, but would not be sufficient for print production. Once the editor decides he’d like to use your image, you’ll have to send him a larger version.
TIP: In Lightroom, you can export a small, web-ready image very easily. Just go to File, Export and choose “For E-Mail” under Lightroom Presets.
** High-resolution images: Generally, high-resolution for a publication means 300 dpi, which is the best resolution for print.
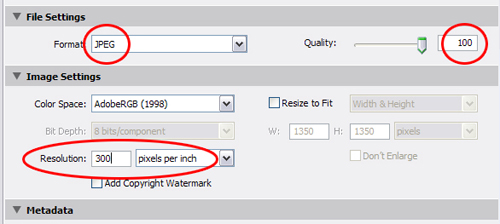
TIP: In Lightroom, you can export a high-resolution jpeg by going to File, Export, and choosing “Burn Full-Sized Jpegs” under Lightroom Presets.
** Jpg: Jpg, or jpeg, is the most commonly used type of image compression. Image compression happens automatically either in-camera, if it’s set to jpeg, or after processing when you save the image as a jpeg. You do have some control over the amount of compression (i.e. loss of data and detail) and, in turn, the size of the file. A small file size means much more information has been tossed out in the compression process, so it is recommended to always use your highest, best quality jpeg settings in-camera. Along with being a compression method, jpeg is the most widely used file type for storing and transmitting images over the web. ** 300 dpi resolution: dpi = dots per inch. Be sure your image is 300 dpi when you export it in Lightroom. You can do this by using the export window. Just go to File – Export and the export window will pop up. The third area down is “File Setting” and that’s where you select JPEG. Below that is “Image Settings” which is where you set the dpi. Be sure to always check the dpi to ensure you have it set to the correct number.
** As large as possible: means the editor wants the original image — or as close to it as possible in file size. If you export in Lightroom, as described above, this will all be done automatically and you should have no worries.
** Complete caption and credit information: Magazines and newspapers want the details. They want to know the who, what, where, when, and why of your photo, and they want it to be accurate and up-to-date.
In other words, if you shoot a travel resort location, include the name of the resort, along with the town and country. If the manager is a predominant subject in the shot, include her name as well. The more detailed you can be, the better, but keep it specific and focused.
For “credit information,” the guidelines are talking about you — how do you want the copyright credit to read? Perhaps you go by JR with your friends and family but you use your full name for photo credits. The editors need to know this, so be sure to spell it out (even if they don’t ask specifically for it). It makes everyone feel better knowing they are using the right information.
** 3/4-page to full-page photographs: Copy space, or space for text, is typically needed in editorial. Think about magazine covers and how much writing is usually placed over the image. Leaving some breathing room for the text to reside is always helpful if you’re aiming for these larger image uses, or a cover shot.
[Editor’s Note: Learn more about how you can turn your pictures into cash in our free online newsletter The Right Way to Travel. Sign up here today and we’ll send you a new report, Selling Photos for Cash: A Quick-Start Guide, completely FREE.]
Travel Photography Resources
5 Dos and 2 Don’ts for Travel Photography
Take Great Photos And Get Paid More For Your Travel Articles
Turning a Photography Hobby into a Monthly Income
The Pros Of Selling Your Images As Stock Photography
16 Mobile Photography Tips And Tricks Every Photographer Should Know


