You’ll remember we covered how your camera reads light and interprets what it sees to achieve “middle gray” and proper exposure. You can find that article in our archives, here. Most of the time your camera is fairly accurate. But what happens if you have a once-in-a-lifetime shot that’s underexposed? Is there a way to save it? The basic answer is yes – or you can at least make it better. Obviously, you’d rather get the exposure correct — or as close to perfection as possible — before you take the picture. But today, we are assuming that isn’t possible. So let’s look at how you can fix the shot in Photoshop for better results. Take this shot from this month’s Photo Challenge, “Game On,” for example:  It’s a great action shot… and, in this instance, it appears slightly underexposed. See how there is no bright white snow? It all appears slightly grayish. In this case, the fix is simple and uses the same tools I recommend using for all your pictures (for more information about digitally developing all of your photos, click here). A quick Levels and Curves adjustment should solve the exposure issue in this shot. Here’s how: **1) Open the file in Photoshop – then, right away (before you do anything else), save it as a .PSD file. That way you will always have your original to go back to. While Lightroom is non-destructive to the original photo, Photoshop is not. So be sure to work on a copy. (I’ll send you more information on working in Lightroom next week.) **2) Up in your menu bar, choose Layer – New Adjustment Layer – Levels. In the Levels box, drag the slider on the right (circled in red) in to meet the black part of the Histogram.
 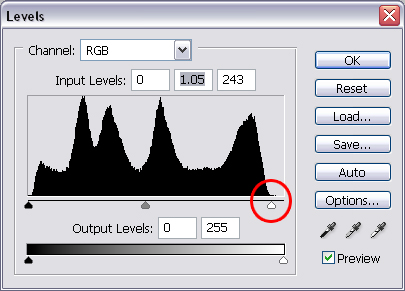 **3) Then, in your menu bar, choose Layer – New Adjustment Layer – Curves. The Curves box will appear. I nudge the part of the line that controls the darks (notice how the lines on the sides of the graph go from light to dark?) down just a small bit (where the dot is circled in red).
 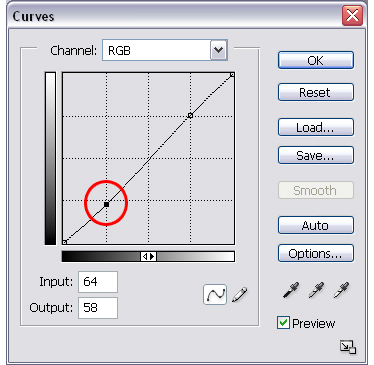 I also bump up the lights a bit more, being careful not to blow out (overexpose) all the detail in the snow (again, where the dot is circled in red).
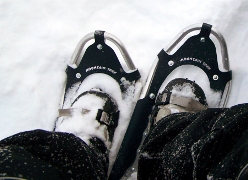
 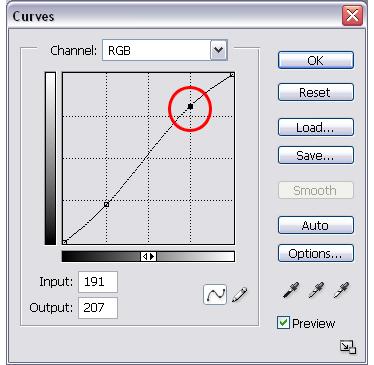 Here’s the resulting image after a quick Levels and Curves adjustment:
  Those two quick and easy tools really made the snow white and brightened the rest of the photograph. See the before and after, below:
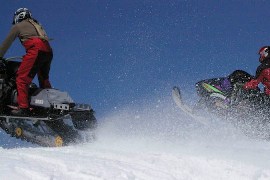
 Now let’s look at another shot from this month’s Challenge… In this shot, you’ll see that it’s a little underexposed with a cyan color shift (notice the slight teal tint?). This is common in underexposed shots.
 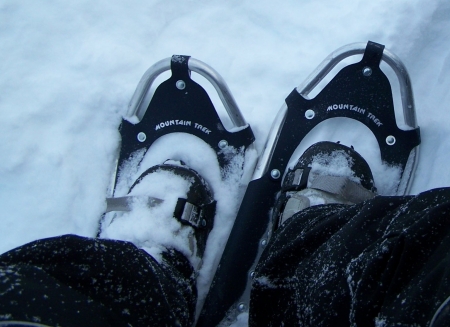 For this shot I performed one extra adjustment… While adjusting the Curves, I also made a quick adjustment to the cyan cast by opening the Curves box and clicking on the gray/middle eye dropper, circled below. I then looked for an area in the photo that I knew was a good middle gray, clicked on it with the eye dropper, and presto! Instant color correction. Then I did the darks and lights adjustment as in the previous example.
 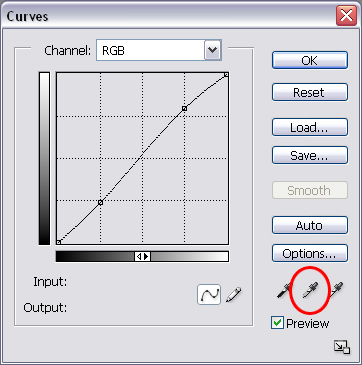 Here’s the image, before and after color and levels corrections:
 Remember, post-processing your files is not only a necessary part of digital photography, it is also an area in which the creative process is still very much a part of the photography experience. There are a number of ways to reach every end result in Photoshop, Lightroom, and other such post-processing software, but having a basic understanding of some of these basic tools will help to get you started. Keep an eye on the photo tip next week, as I’ll go over how to make these changes in Lightroom. ENTER TO WIN! This month’s Photo Challenge theme is “Game On.” If you have a picture to submit, log on to our website and click on the Enter to Win tab. (Note: First-time users need to register on the “register” link on the right side bar first. Once you have a username and password, click “Enter to Win” to upload your photo. Only one photo per applicant will be considered. No purchase necessary to register.) Photos are due by 8:00 a.m. EST, Monday, May 26, 2008. [Editor’s Note: Learn more about how you can turn your pictures into cash in our free online newsletter The Right Way to Travel. Sign up here today and we’ll send you a new report, Selling Photos for Cash: A Quick-Start Guide, completely FREE.]
Travel Photography Resources
5 Dos and 2 Don’ts for Travel Photography
Take Great Photos And Get Paid More For Your Travel Articles
Turning a Photography Hobby into a Monthly Income
The Pros Of Selling Your Images As Stock Photography
16 Mobile Photography Tips And Tricks Every Photographer Should Know
