Adobe Lightroom is an indispensable tool when it comes to processing your photos for stock, or for wherever you want to sell them. I use it all the time. And only occasionally do I move over to a robust program like Photoshop for more extreme edits. The trick is to take the photos you have captured in your camera and process them for good, natural-looking results. The more natural the processing looks, the more longevity the photo will have in terms of saleability for stock. So the first adjustment I make is always with the exposure, if it needs it, as well as the white balance. In Lightroom, your exposure options are on a slider. You can simply drag the slider to the right or left and watch your image brighten and darken. 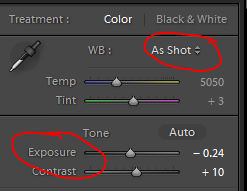 White balance is a pull-down menu. On the above clip, it’s set to “as shot” but you have other choices like…
  Below I’ll show you three photos. I had to adjust the white balance on each one but only two needed an exposure adjustment. Once you have the exposure and white balance set, you can move on down the basic panel of controls in Lightroom. For stock, I almost never adjust the contrast slider. I find that the contrast boosts enough with the other sliders. Some of my favorite ones to use are these…
 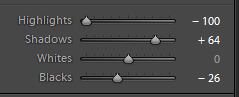 The next group of sliders under “presence” I mostly leave alone. If you do use them (on occasion), I’d recommend sliding them sparingly, like a plus or minus 5, no more than 10 max. Then, the one thing I use religiously is the area in Lightroom called the Tone Curve. Here, I click and drag the diagonal line until it forms a gentle “S” curve.
 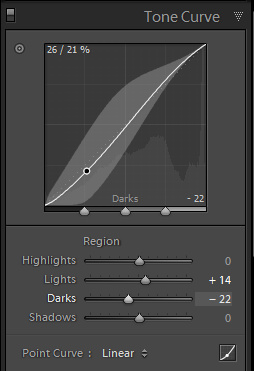 And that’s basically it. After doing all this, I then go back to the tools at the top to crop or straighten if the image needs it. I might also use the spot removal to “heal” a blemish (I leave moles and scars) and the adjustment brush to brighten and whiten teeth as well as to enhance the eyes. Here are three before and after examples:
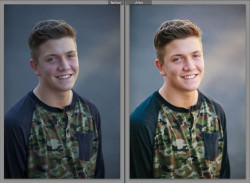
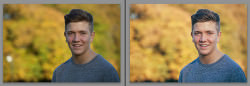
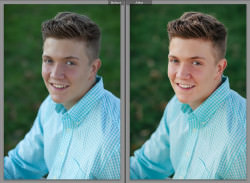 This shot was in the shade, so it was a little underexposed and cool. I adjusted both the exposure and white balance to start with. The shot above was also in the shade but not a completely solid shade … so it was important to me to try to balance out the shadows on my subject’s face. I added a little exposure overall, adjusted the white balance, and then used the highlight and shadow sliders to get a more even tone across his face. Here again was the cool shade, as well as all that grass and his shirt, which all tend to throw the white balance off … By simply telling Lightroom that it’s “daylight,” the colors became much warmer and more natural. Of course, there is more extreme processing that could be done, but for stock most of the time less is better. You want to process enough to give your shot a clean polished look while at the same time preserving the integrity of the photo. It’s much more useful to designers when they can further process or enhance the shot to meet their own needs. Share on Facebook
Travel Photography Resources
5 Dos and 2 Don’ts for Travel Photography
Take Great Photos And Get Paid More For Your Travel Articles
Turning a Photography Hobby into a Monthly Income
The Pros Of Selling Your Images As Stock Photography
16 Mobile Photography Tips And Tricks Every Photographer Should Know
